- Premiere Tutotial
Flash Transition in Premiere: How to create flash transition in Premiere Pro?

Feb 04,2020• Proven solutions
The key to creating great videos is hiding in the details. Arranging video clips into a cohesive structure is relatively easy, but adding visual effects and seamless transitions is what is going to win the audience over. In recent years, the white flash transition has become widely popular, as we have seen it in popular reality shows, music and numerous other types of videos. This simple, but effective video editing trick can help you produce more visually compelling content, so we decided to take you through different methods of creating the white flash transition in Adobe Premiere Pro. We’ll also show you where you can find these stunning transitions online and guide you through the process of incorporating them into your projects.
Easier way to create and add Flash Transition to Video: FilmoraPro
The newly released professional video editing software FilmoraPro allows you to create Flash Transition and add it to clips in an easier way.
- Create Flash Transition panel
- Add the Flash Transition panel to the timeline and then adjust the transition clips duration to make a perfect match
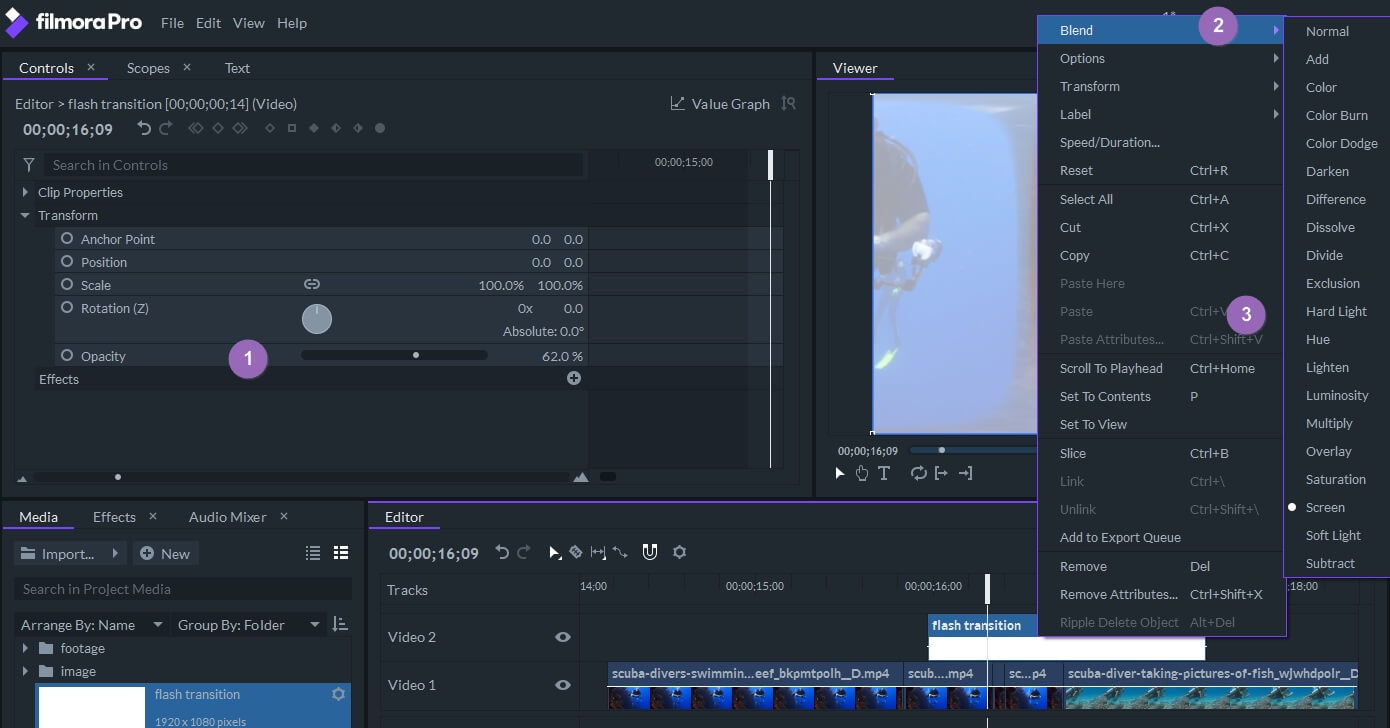
- Go to Controls tab and adjust the Opacity to set up the flash transition opacity and then right click the transition and select the target Blend mode
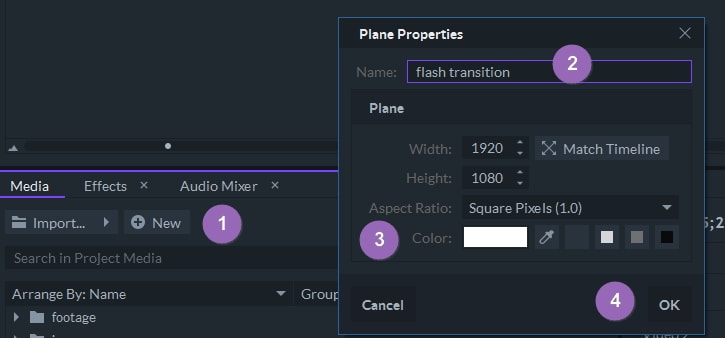
After launching FilmoraPro, just click the New tab to create a new panel and set up its properties accordingly. Here, I select the white color to make a white flash transition, but you can always choose the color based on your needs.
If needed, you can also add some keyframings to the transition panel. Just click the free download button to try the FilmoraPro video editing tools today.


How to Make White Flash Transitions in Adobe Premiere Pro [ 6 Ways]
Even though we’re going to show you how to create white flash transitions in Adobe Premiere Pro, you can use other video editing software like Final Cut Pro or Sony Vegas to create a fairly similar effect. Before you start creating any of the variations of the white flash transition, make sure that the footage is properly placed on the timeline.
1. Creating White Flash Transition with Color Matte
Here is a quick way to create white flash transition between clips with the Color Matte in Premiere Pro. Click on the New Item icon in the Project Panel and select the Color Matte option from the menu.

Keep the default Video Settings and use the Color Picker to change the item’s color to white. Confirm the changes by clicking on the OK button, and insert the name for the new matte.

Drag the color matte you just created from the Project Panel and place it directly above the cut between two clip. Drag one of the matte’s ends left or right to adjust its duration and then position the playhead at its beginning.

Go to the Effect Controls Panel and reduce the Opacity value to zero, then add a keyframe. Move the playhead to the middle of the Color Matte clip, increase the Opacity to 100 and add a keyframe. Place the playhead at the end of the clip, change the Opacity back to zero and add the ending keyframe. Preview the results and make additional adjustments if necessary.
Check the video tutorial below to check the detailed steps:
2. Creating Double Flash with Dissolve
The Double Flash – Place the playhead at the spot on the timeline where one clip ends and another begins, and then use the left arrow key to jump back three frames. Make a cut, and then repeat this action two more times. Head over to the effects panel and drag and drop the Dissolve transition to each cut, including the cut where two clip actually transition into each other and adjust the duration of the Dissolve transition. In order to maximize the flash effect, you’ll want to keep the duration of each transition as short as possible.
3. Creating Flash transition with Flash build
The Flash Build – Position the playhead ten frames to the left from the cut between two clips. The fastest way to do this is to drag the playhead to the cut between two clips and then hold the Shift key and press the left arrow key twice. Afterward, you should go to the Effects panel and then just drag and drop the Brightness and Contrast effect to the clip. Click on the Brightness and Contrast options In the Effect Controls panel to add two keyframes at the current playhead’s position and set their values to zero. Hold the Shift key and press the right arrow key twice to jump forward ten frames and then add two more keyframes. Set the brightness and contrast to the maximum for the second pair of keyframes.
Change the keyframe interpolation by adjusting the Velocity Graph in the Effect Controls panel in order to introduce the flash gradually. You can access the Velocity Graph by clicking on the drop-down arrows next to the Contrast and Brightness options. You should repeat the entire process in the second clip, but the first pair of keyframes should have the exact same Brightness and Contrast values as the second pair of keyframes in the first clip. The second pair of keyframes in the second clip should have the same Brightness and Contrast values as the first pair of keyframes in the first clip. The velocity value should be reversed, so instead of increasing it, you should gradually decrease it.
4. Combining the Double Flash and Flash Build Transitions
You can start by adding the Brightness and Contrast effect to the clip positioned before the cut. Place the playhead at the exact spot where two clips transition to each other and add a keyframe for both Brightness and Contrast, and then jump three frames to the left by hitting the left arrow key. Add two more keyframes at the new position of the playhead, and then perform this action once more. Hold the Shift button and press the left arrow key to jump ten frames back and add two more keyframes. The Brightness and Contrast values, as well as the Velocity, should be the same as for the Build Transitions method. The only difference is that you don’t have to add the Brightness and Contrast Effect or the keyframes to the second clip since you want to have a hard cut between two clips.
5. Creating Flash transition with Ghost and Zoom
Ghost and Zoom – Duplicate both clips, by holding the Alt key if you are using a PC or the Option key if you are editing on a Mac and then drag these new clips to the video track above the one at which the original clips are located. Head over to the Effect Controls panel and click on the Opacity drop-down menu and proceed to change the Blending mode of both copies. You can select the Color Dodge blending mode to generate a flash or try out different options to see which one best fits your footage.
After changing the blending mode for the outgoing clip, you should add the Transform effect to it and then position the playhead at its end and add keyframes for the Scale and Opacity options. Move the playhead for ten frames to the left and add two more Opacity and Scale keyframes, and reduce the opacity value to its minimum, Jump back to the previous pair of keyframes and increase the Scale value up to 175 or 200 to create the Zoom effect. Make sure that the Use composition angle box is unchecked and then boost the Shutter Angle option’s value up to approximately 100. Proceed to adjust the velocity of the keyframe interpolation for the Scale and Opacity options since it will enable you to gradually build the zoom in the transition. Repeat the entire process in reverse on the other clip you copied, so that the zoom and the flash have the same intensity as in the clip that just ended. Gradually reduce the Scale and Opacity values in the first ten frames of the second clip.
6. Creating Flash Transition with the Lightning Effects Flash
The Lightning Effects Flash - Click on the New Item icon that is located in the Project Browser and select the Black Video option from the drop-down menu. Just click the OK button when the New Black Video window appears on the screen because the new video you’re creating will have the same settings as the sequence you’re currently working on. The new black video will be located in the Project Panel and you just have to drag and drop it to the video track above the one on which the two clips are located. Make sure that the black video extends over both clips, place the playhead at the same position where one clip ends and the other begins and then head over to the Effects panel. Find the Lighting Effects option and add it to the black video. After you’ve applied the effect you should head over to the Effect Controls panel and click on the drop-down arrow next to the Light 1 option. Adjust the Center feature so that the spotlight you added to the black video goes off screen and add a Minor Radius keyframe. Move the playhead five frames to left and add another Minor Radius keyframe and perform the same action after moving the playhead ten frames to the right. Jump to the keyframe that is furthest to the left and reduce the Minor Radius value to zero, then increase the same value to 100 in the keyframe in the middle and decrease it back to zero on the third keyframe. Change the blend mode of the black video to Screen in order to make the videos on the track below visible and that’s it you have your Lighting Effect white flash transition.
Downloading 4K White Flash Transitions from Online Sources
Animating effects, duplicating video clips or adjusting the velocity of keyframe interpolation can be an overwhelming and time-consuming tasks for an inexperienced video editor. Fortunately, there virtually endless online sources, such as 4KFREE.COM that lets you download flash transitions for free. Keep in mind that you’ll have to subscribe to their mailing list in order to be able to download any of the available visual effects, motion graphics or transitions.
The Flash Transition package contains five different transitions that you can import into any video editing software that supports 4K resolutions the same way you would import a regular video file. That’s because these transitions are actual footage recorded in a studio, so after you’ve added these flash transitions to the Project Panel you can drag and drop them onto the timeline. The quickest and the easiest way to use one of these transitions is to place it precisely over the cut and just change the blend mode to Screen. Since this is actual footage you can manipulate it in any way you want in order to create the transition that fits perfectly into your video.
You may also like: Best Transitions Plugins for Premiere Pro in 2018
Conclusion
Creating a quick flash transition is easy, but creating a double flash or the Lightning Effect transition requires a higher level of video editing skill. What’s more, there are countless online sources that offer amazing white flash transitions that can be easily added to your projects. Do you like using white flash transitions in your videos? Leave a comment below and let us know.
Bring up your video to a professional level with straightforward tools.
Try It Free Try It Free
Liza Brown
chief Editor
0 Comment(s)